Brick front garden wall and steps makeover - progress
Golly, I didn't think this would actually happen - but our front garden wall and steps are finished. All that's missing now are the refurbished hoop top railings on both sides of the boundary.
We always knew that we'd have to get the frontage re-done at some point. But after we'd come back late one evening to find our front pier pushed/fallen over, we knew this was going to be sooner rather than later.


We always knew that we'd have to get the frontage re-done at some point. But after we'd come back late one evening to find our front pier pushed/fallen over, we knew this was going to be sooner rather than later.
Materials we've used for the brick wall
- The original wall was built with Luton Grey bricks, which are typical for our area (the clue's in the name). We've sourced beautiful new handmade Luton Greys bricks from HG Matthews, a brick manufacturer near Chesham (the same guys who installed our Jotul woodburning stove).
- Everything had to come down first, but the cement mortar was putting up quite a fight. Really brings it home why lime mortar is so much better in the long run. A wall that's been built with lime mortar will last decades, but bricks will still outlast the mortar, and when it comes to taking the wall apart, you should be able to re-use almost every brick. We've had good experiences with ready mix EcoRight lime mortar bought from the Old House Store. As it is a retaining brick wall, we're using the 'stronger' NHL5 mix throughout. That's probably best for an outdoor wall that has to retain a metre or more of soil.
Features of the old brick wall that we'd like to keep
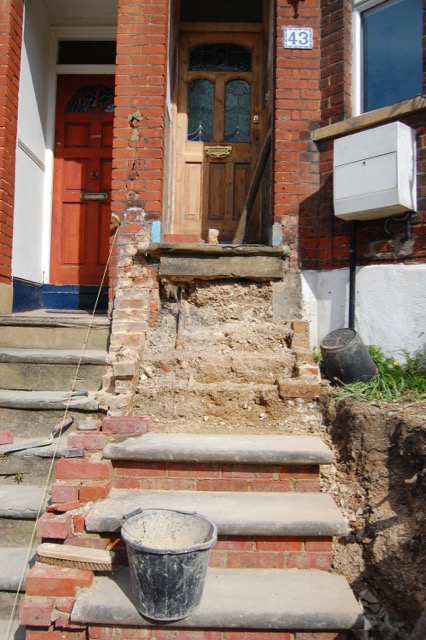
Here are some 'before' pictures, that show the crumbling front wall, loose steps and broken brickwork. That's why it had to go - before it buried someone!- There is tile creasing in the piers and a tiled 'fan' in the middle of the wall. Tile creasing protects the lower wall from rainwater, as rain runs off the little nibs of the tile. So ideally, we wanted to have tile creasing all the way through. Thanks to friends of ours who had half their roof re-tiled and gave us their old tiles, we have plenty of 'Dreadnoughts' to have tile creasing all the way along.
- The brick toothing or dogs tooth detail mirrors the top of the house, where you find it just below the wallplate/fascia board, so we definitely wanted to keep/reinstate it.
- You can also see that there was only a small 'cut-out' for the bins, meaning they stood halfway across the landing before the steps. So that's something we wanted to enlarge in the new layout.


Logistics
- The other half took care of project managing. It's no mean feat to organise delivery of tons of ballast, pebbles, readymix lime mortar, plus 1400 bricks. And all that on a residential road with cars parked either side. And did I mention the skips? The guys from Holywell in Hemel Hempstead are magicians when it comes to placing a skip between parked cars and curbs, on a road that has a regular bus service. They, and the Butterfields delivery guys really know their vehicles and have nerves of steel. Still, the OH had to make sure they had a fighting chance, and do an impressive juggling act with ours and the neighbours' cars.
- We also had to think about which set of steps to remove first, so that our neighbours and us would have good access to the house throughout the whole process.
The main wall was taken down and the steps to the ginnel (on the right) removed. My apple tree (Laxton's Superb) was propped up. First we thought we'd have to dig the tree out, but the roots seemed to keep it pretty firmly in place, so fingers were crossed that it would stay where it was.


Pier and foundations are in. Measuring up for the bin store.

We might put in this little gate that the OH found - TBC, as it might be too spiessig.

Ta-da! Half of the wall up thanks to Lenny and his team.

Here you can see the space for the rubbish bins.

Protecting the new brickwork with hessian, as lime mortar can stop carbonating with frost and what you end up with is a sandy mess. Our luck - as with when we had the back garden wall done, frost was forecast again, this time at the end of April. Hessian does a good job of keeping the chill off though, as long as it's only around minus one degree overnight.


The side steps complete, so the main stairs had to be removed and rebuilt. We're reusing original sandstone steps that we've collected over the years from neighbours who've replaced theirs.
Removing them, literally step by step.

Tile creasing detail...


The final sandstone steps being bedded in...


More to follow - eventually.

