A man and his dog - or how chaos turned into a project
On Tuesday we finally had a visit from the damp guru from Shropshire.
It turned out to be all that we could hope for. I felt like a Rose of Jericho plant that was finally dropped into a bucket of water. With plenty of coffee and some improvised sarnies, we worked our way through the whole house.
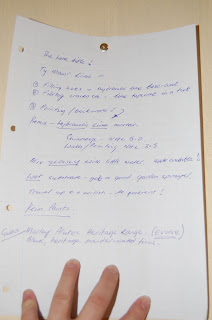
We now know just about everything about how to tackle the project, and we are a good stretch further into developing a plan.
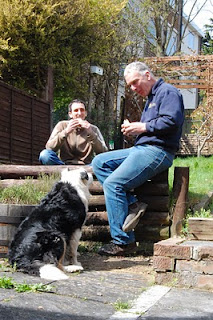
Peter (from Heritage House Building and Restoration) and Soot (the dog) stayed until about 10pm, and left us with lots of drawings and a good idea about the main jobs.
KITCHEN: Digging out the old limecrete floor and laying a concrete floor.
Ripping out all plasterboard and possibly insulating the outside walls.
Knocking the fireplace open and raising the height of its lintel.
DINING ROOM:
Digging the builders' rubble out from under the floor joists to ensure good airflow.
Replacing the joist ends with treated timber, using stainless steel bolts.
PIPEWORK
GROUND:

Digging up the clay pipework at the back and replacing it.
Lowering the ground levels, building in a few steps, creating a sort of lower tier.
Adding a gully to which all ground close to the house will drain to.
SIDE RETURN WALL:
Remove redundant bit of waste pipe, possibly use the cast iron to replace other bits.
Re-design the pipes so that grey water and rain water are not mixed any more. This includes leading the waste water from bathroom and kitchen directly into the soil stack.
Remove cast iron rain water hopper (may be used to replace the plastic one at front of house) and run the rainwater in a closed system, straight into the underground pipes.
BATHROOM UPSTAIRS:
Run the sink and bath tub pipes directly into the toilet waste pipe; sink pipe can be run partly BELOW the floorboards.
GUTTERS:
Replace guttering at back with cast aluminium guttering.
FRONT ELEVATION:
Remove the blue masonry paint from all stone lintels (should be done before next winter), to allow stone to breathe.
Re-point whole front elevation in lime (at some point, ideally this year).
INTERNAL WALLS:

Fill cracks with ready-made lime putty.
Clean ceilings as much as possible.
Paint with silicate paint.
FLOORS :
Insulate the upper bedrooms with sheep wool insulation between the joists.
CHIMNEYS:
These will eventually need to be rebuilt. It may take a strong wind storm, or simply five or ten years, so we decided to wait until they fall. Approximate cost of rebuilding them, including scaffolding, ca. 5K.
GARDEN:
Create woodland area at the top of garden (remove paving slabs and plant trees).
Remove all the concrete stone effect rubbish.
Create several terraces and generally a more rounded, fluid feel.
LEAN-TO:
Drain rain water runoff through a carving in the stairs into lower drainage system.
Possibly whitewash back wall or put a brick wall in front of it.


It turned out to be all that we could hope for. I felt like a Rose of Jericho plant that was finally dropped into a bucket of water.
 With plenty of coffee and some improvised sarnies, we worked our way through the whole house.
We now know just about everything about how to tackle the project, and we are a good stretch further into developing a plan.

Peter (from Heritage House Building and Restoration) and Soot (the dog) stayed until about 10pm, and left us with lots of drawings and a good idea about the main jobs.
KITCHEN:
 Digging out the old limecrete floor and laying a concrete floor.
Ripping out all plasterboard and possibly insulating the outside walls.
Knocking the fireplace open and raising the height of its lintel.
DINING ROOM:

Digging the builders' rubble out from under the floor joists to ensure good airflow.
Replacing the joist ends with treated timber, using stainless steel bolts.
PIPEWORK
GROUND:

Digging up the clay pipework at the back and replacing it.
Lowering the ground levels, building in a few steps, creating a sort of lower tier.
Adding a gully to which all ground close to the house will drain to.
SIDE RETURN WALL:
Remove redundant bit of waste pipe, possibly use the cast iron to replace other bits.
Re-design the pipes so that grey water and rain water are not mixed any more. This includes leading the waste water from bathroom and kitchen directly into the soil stack.
Remove cast iron rain water hopper (may be used to replace the plastic one at front of house) and run the rainwater in a closed system, straight into the underground pipes.
BATHROOM UPSTAIRS:
Run the sink and bath tub pipes directly into the toilet waste pipe; sink pipe can be run partly BELOW the floorboards.
GUTTERS:
Replace guttering at back with cast aluminium guttering.
FRONT ELEVATION:
Remove the blue masonry paint from all stone lintels (should be done before next winter), to allow stone to breathe.
Re-point whole front elevation in lime (at some point, ideally this year).
INTERNAL WALLS:

Fill cracks with ready-made lime putty.
Clean ceilings as much as possible.
Paint with silicate paint.
FLOORS :
Insulate the upper bedrooms with sheep wool insulation between the joists.
CHIMNEYS:
These will eventually need to be rebuilt. It may take a strong wind storm, or simply five or ten years, so we decided to wait until they fall. Approximate cost of rebuilding them, including scaffolding, ca. 5K.
GARDEN:
Create woodland area at the top of garden (remove paving slabs and plant trees).
Remove all the concrete stone effect rubbish.
Create several terraces and generally a more rounded, fluid feel.
LEAN-TO:
Drain rain water runoff through a carving in the stairs into lower drainage system.
Possibly whitewash back wall or put a brick wall in front of it.


